 Virtual Colossus
Using Virtual Typex
Welcome to Virtual Typex. This page will help you get started with this virtual cipher machine. If you’d rather download and print these instructions, there is a PDF version.
The sound effects are muted at first, so for the full experience (recommended), click the blue speaker button at the top left, or choose Unmute from the menu. The sounds were recorded from GCHQ’s own working Typex, so what you hear is absolutely authentic.
Virtual Typex should work in most modern browsers, such as Google Chrome, Mozilla Firefox and Microsoft Edge. There is a known problem with Safari on the Mac animating layers of graphics; if you see this, please use Chrome or Firefox for now.
The main menu at the top has a Prefs drop-down with options for Settings (to change the rotors and wiring), Messages (a number of test Typex and Enigma messages to try), Instructions (a link to this page) and Unmute (Mute once the sound is on). To the right of the menu are two zoom buttons, for a better overall view or more detail. Please make sure your browser’s own zoom is set to 100%.
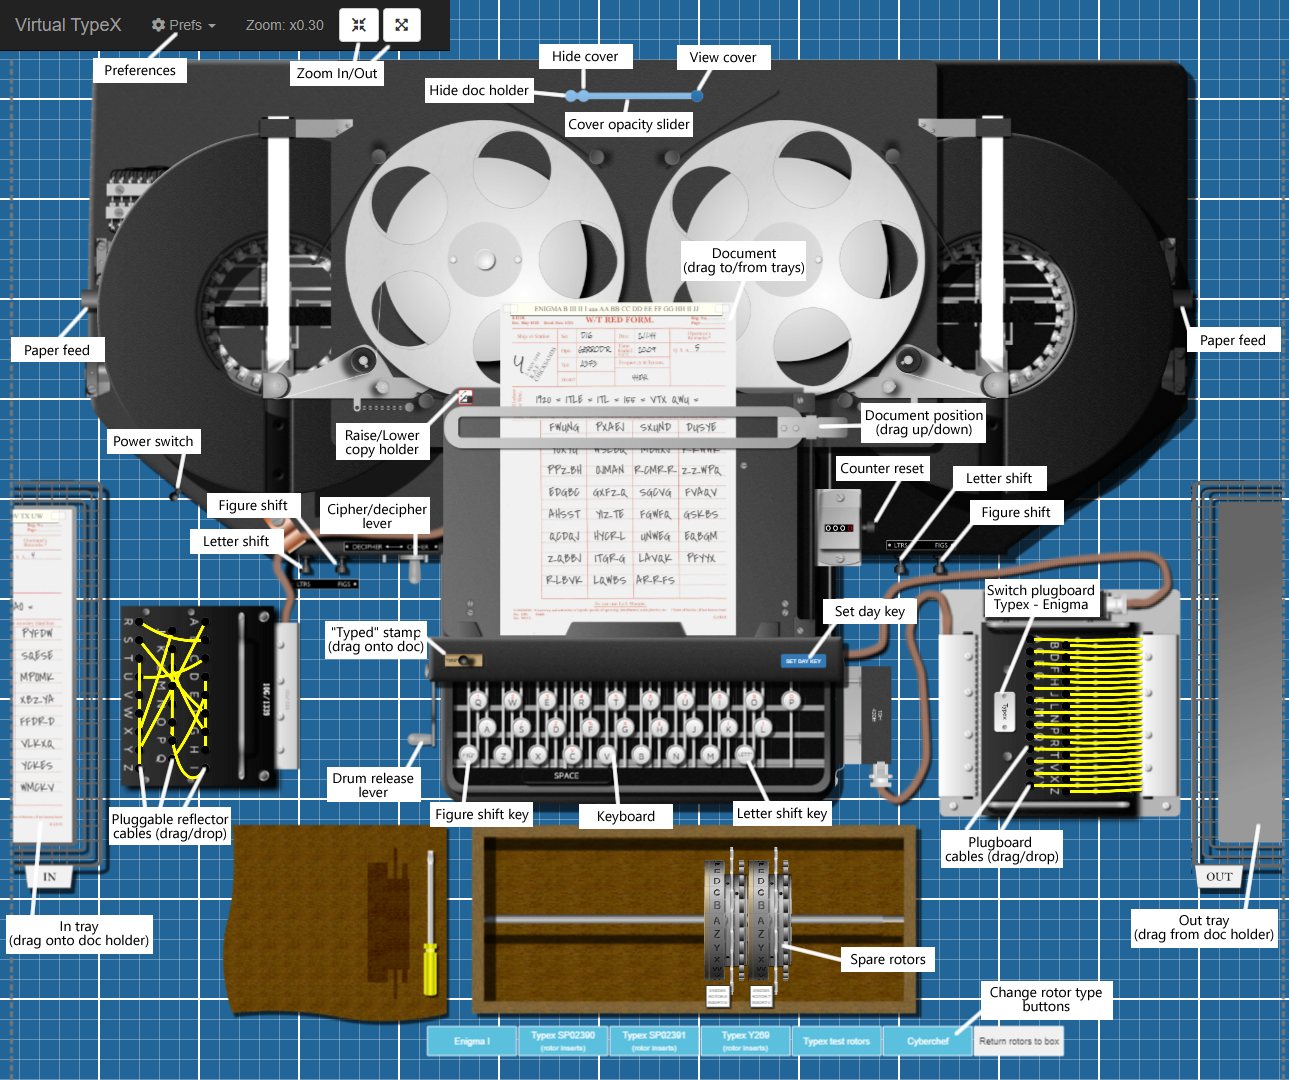
The image below shows the things you can click or drag in Virtual Typex. If you have a keyboard, you can type on it rather than clicking or tapping the keys on screen.
At the top middle of Virtual Typex is a slider that lets you see under the cover to watch the mechanism working. Slide it to the far right to show the top cover, and to the second point from the left to make it fully transparent. The point on the far left also hides the document holder.
Getting started
Before you begin, make sure the Typex is switched on with the power switch: you should see the motor running under the cover. Next, check that both printers are set to letter mode, using the two push buttons in front of each printer. Finally, check that the cipher/decipher lever is at cipher.
You can work the keyboard by clicking the keys, or by typing on your computer keyboard if you have one. Only the keys A–Z and the space bar are available, with the special FIGS and LETTS buttons (figure shift and letter shift) on the \ and / keys. To type one of the numbers or punctuation marks shown in red above each key, press FIGS (\) first, then the key. Press LETTS (/) to switch back to letters. The Z, X and V keys are physically linked to the FIGS, space and LETTS buttons, so to type those letters, use the figure-shifted characters on the D, G and C keys.
Type a few keys: whatever you type should be printed on the left-hand printer.
Try moving the slider fully to the left to make it easier to see what you’re typing and the mechanism.
Type some numbers by pressing FIGS once, then any of the QWERTYUIOP keys. Then try typing the word TYPEX (hint: you’ll need figure shift to get the X).
Typex has two printers, which print on 3/8 inch tape. The left-hand printer prints the text you type, and the right-hand printer the enciphered or deciphered text. To feed out paper and see what you’ve typed, use the knob on each printer, which feeds out blank tape.
The cipher/decipher lever doesn’t change how the rotors mix the text, but it does change how the two printers work. In cipher mode, the left-hand printer prints the plain text, including numbers and punctuation, while the right-hand printer prints the cipher text using only A–Z, automatically adding a space every 5 characters to split it into easily read groups. In decipher mode it is the other way round: the left-hand printer echoes the cipher text being typed (in groups of 5) while the right-hand one prints the plain text, with numbers and punctuation.
Reading a document
A document holder sits just above the keyboard. (If you have hidden it with the slider, move the slider back to the right to see it again.)
It has a movable bar to keep track of your place in the document. Drag the handle on the far right of the bar to move it up and down. To mark a document as done, drag the rubber stamp onto it and let go.
You can swing the document holder up to reach the rotor unit, to set or change the rotors. A button at the top left of the holder toggles it up or down.
A counter shows how many characters have been typed. The 0 and 5 units are shown in red, which helps you keep track when typing cipher text split into groups of five. To reset the counter before starting a new text, click the knob on the right of the counter until it shows 0000.
Documents can be dragged off the holder into the in and out trays at the far left and right of the screen. New Typex and Enigma documents can be loaded into the in tray from the Prefs / Messages menu.
Changing the rotor settings
Typex has five rotors: the first three turn during enciphering, while the two on the right stay still. Each rotor has the letters A–Z round its edge, which show through the windows on top of the drum unit. The operator set all five rotors to a new start position for each new message.
Click the white button at the bottom left of the drum unit to open or close its cover and see the rotors themselves.
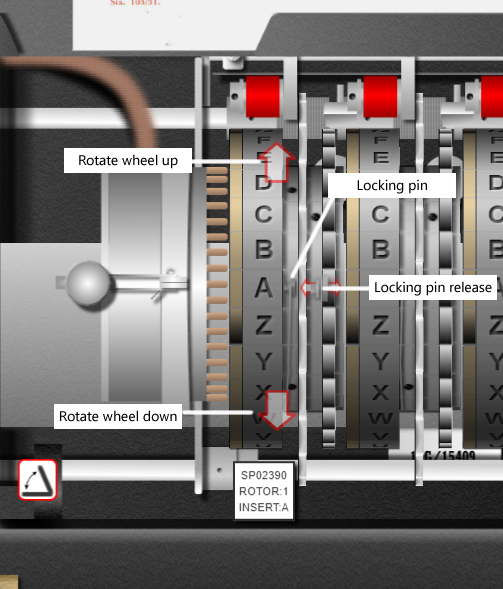
You can change the starting letter of each rotor, with the cover open or closed, by clicking the up and down arrows that appear above it.
Each rotor’s wiring can also be turned to any of 26 positions relative to the rotor body, changing the internal wiring (on Enigma this was called the Ringstellung).
To change the ring position, first release the small spring-loaded pin by clicking the locking pin release icon, then turn the wheel up or down as before. When it’s set, click the locking pin release again.
Swapping the rotors
In 1939 the Typex Mark II came with a set of five “black” rotors, but from 1 June 1941 two more drums, from a set of five “red” rotors, were added, giving seven to choose from.
The rotor order was part of the day key, and you can swap the rotors in Virtual Typex in just the same way.
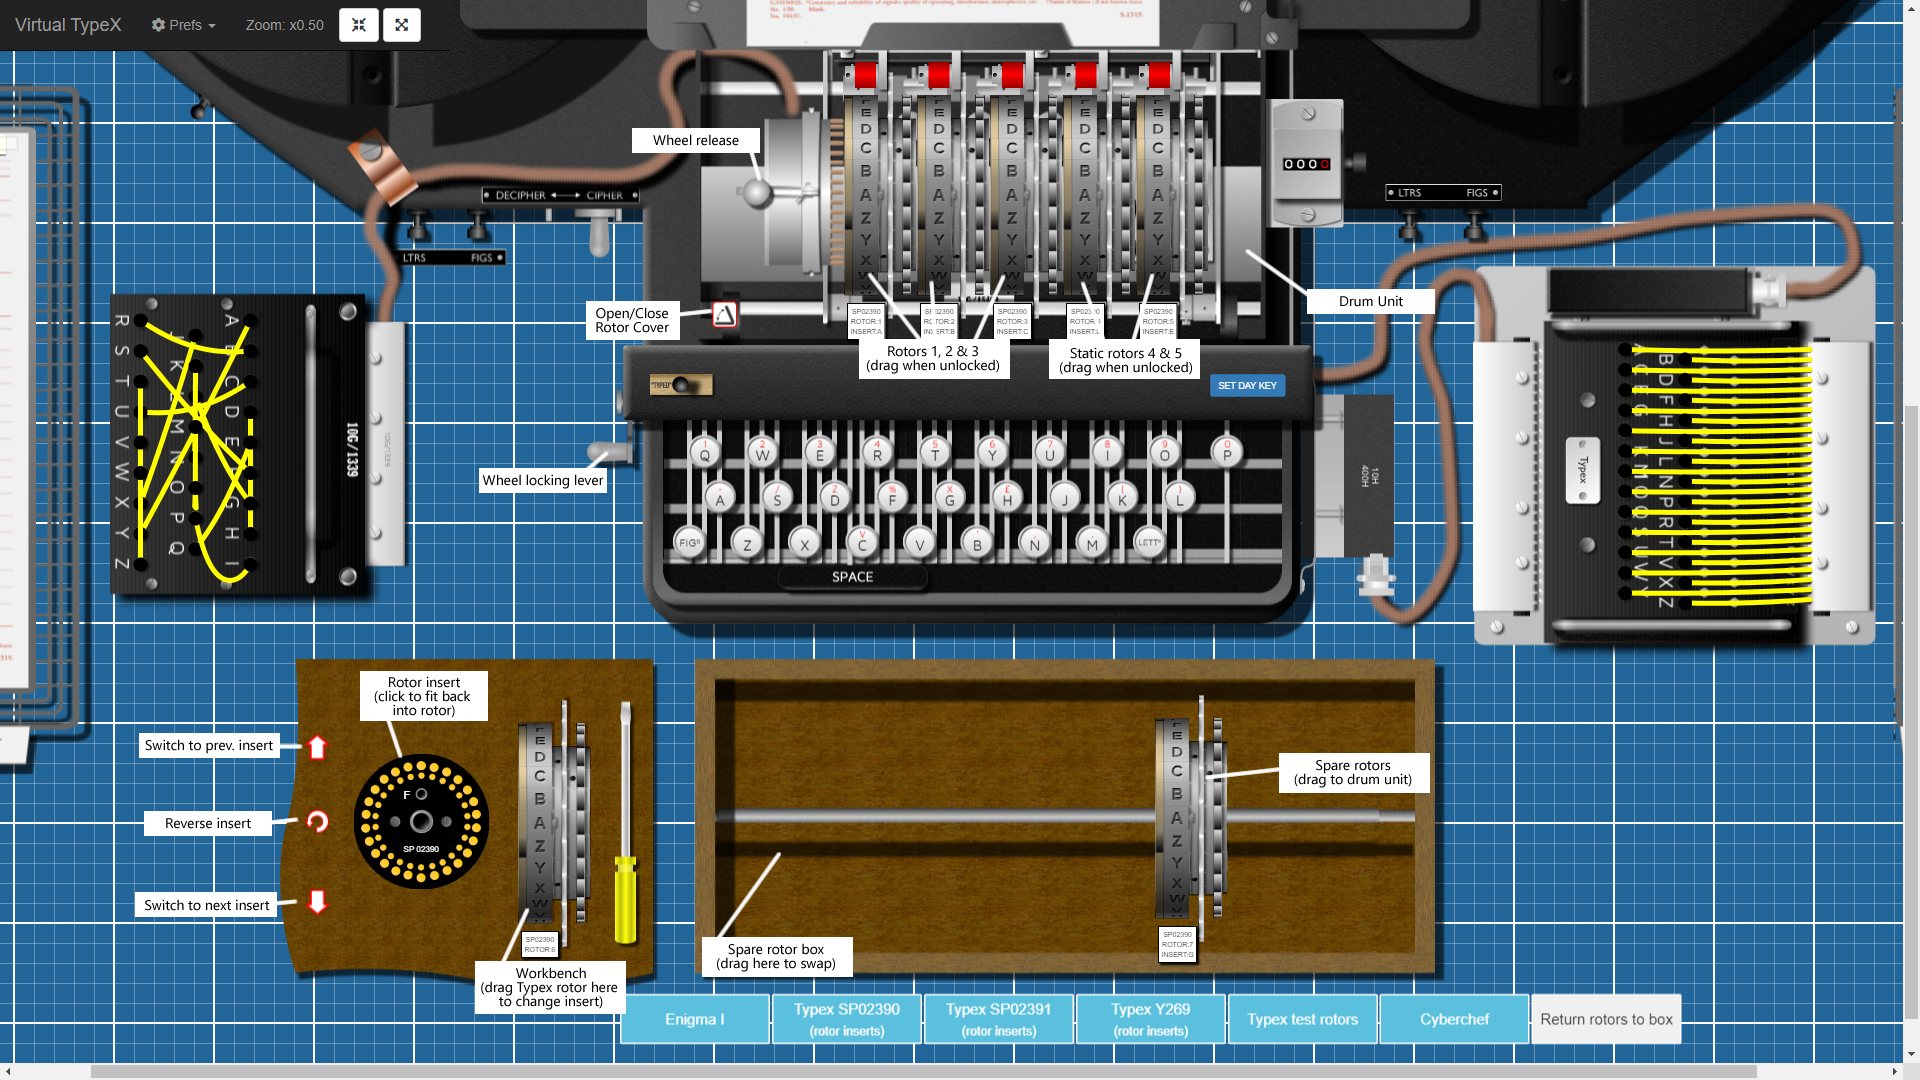
Each rotor can be replaced with any of the others available. To release the rotors, first release the wheel locking lever, then press the unlock button on top of the reflector head so they can be removed. To fit them back, do the reverse: lock the reflector head, then release the wheel locking lever.
Once the rotors are released, you can drag them one at a time to the storage box below the keyboard, or to any of the five rotor positions in the drum unit. Drag a rotor until a dotted white line appears round the place you want to drop it, then let go.
Virtual Typex comes with several sets of rotors for you to use:
- A set of five Enigma I compatible rotors, with two special blank rotors (coloured white) for the two extra static rotor positions. (The Enigma I had three rotor positions, so on Typex the last two need filling with straight-through rotors.)
- Three sets of Typex rotors with reversible inserts, seven rotors in each. The set marked Y269 also includes 14 wiring inserts, which can be swapped into any of the rotor bodies.
- A set of five Typex test rotors. These were wired straight through and used for testing a Typex after manufacture or repair.
- A set of eight rotors with wiring matching GCHQ’s CyberChef application. The rotor wiring was randomly generated, but is included for testing compatibility with their emulation, which was tested against a real Typex.
Click one of the blue buttons along the bottom of the page to switch the rotor box to a different set. This opens the drum unit, removes all the fitted rotors, and swaps in the new set, ready for fitting. A separate button just returns all the rotors to the box without changing the set.
As mentioned above, the Typex Y269 rotors have extra wiring inserts that can be removed and swapped with any from a set of fourteen. The inserts can also be put back into the rotor body reversed, doubling the number of possible wiring arrangements. The insert, body and rotor order were all part of each day key.
To swap an insert, first select the Typex Y269 rotors, then drag one of them onto the workbench (next to the screwdriver). The insert is removed so you can see it. Use the up and down arrows to the left of the insert to change it, and the rotate button between them to turn it over. The front of each insert is marked with a letter from A to N, and the back with the same letter plus R (for example B and BR). Click the insert to put it back in the rotor body, then drag the rotor back to the box or into the drum unit.
The rewireable reflector
The original Typex reflector head was a fixed unit, wired to connect each letter to one other. The reflector sends the signal back through the rotors by a new route, and makes encryption and decryption reciprocal: if the signal goes in at A and is reflected back through the wiring for Y, then when decrypting, Y is sent back along the path for A. From around November 1941 a rewireable reflector was introduced, with the reflector head’s wiring brought out to a plugboard to the left of the keyboard. Thirteen wires were included, so the reflector wiring could be changed regularly, increasing security while still allowing an Enigma-compatible reflector.
In Virtual Typex you can rewire the reflector by dragging the black circles at the ends of the wires away from their sockets. To swap cables, it can be easier to remove both ends of a cable and drop it. To reconnect, drag a black end circle onto a free socket until a white circle shows it will connect. For a complete, valid reflector, all 13 wires must be connected, filling all 26 sockets.
Several reflector settings are available in Prefs / Settings, including the three Enigma reflectors, UKW-A, B and C.
The plugboard
Early versions of Typex had no separate plugboard like the military Enigma; instead, the two extra static rotors had a similar effect. Again, around November 1941, a plugboard was added to the Typex Mark II (making it the Mark 22), between the keyboard and the entry disc of the drum unit.
One difference between the Enigma and Typex plugboards is that Enigma cables always swapped two letters with each other (C to S and S back to C), while Typex allowed each letter to go to a different letter (C could go to S, but S might go to X). This again increased the number of ways to mix the text, and so the security, while still allowing it to be wired like Enigma.
The plugboard was modular: it could be unplugged and replaced with another module, so a new wiring arrangement could be set up while the current one was in use, then swapped quickly. Virtual Typex includes two modules: a Typex module and an Enigma module. The entry disc at the far right of the drum unit was wired differently on Typex and Enigma, so the wiring between the keyboard and entry disc had to change. It’s hard to find exactly how this was done, but I believe the simplest option was a separate Enigma plugboard module with altered internal wiring. That way a Typex could be switched quickly between Typex mode and Enigma emulation just by swapping plugboard modules.
To swap modules in Virtual Typex, click on the white label on top of the plugboard.
There are twenty-six wires, one for each letter on the keyboard. To make or change a connection, drag the black circle at the left end of a wire to an empty socket, or let go of it in space to clear its socket. All the wires must be connected; if a letter doesn’t need swapping, connect its wire to the socket with the same letter.
The plugboard wiring can also be set in Prefs / Settings, by entering space-separated letter pairs (any letters left out are wired straight through), or a list of twenty-six letters, connected to A–Z in order.
Setting a day key
You’re hopefully ready to encipher your first message on Typex. As this is the first message of the day, we need to set up the day key: the rotors, inserts, ring positions and plugboards.
We need a message to encipher, so go to the Prefs / Messages menu, where you’ll find several example Typex and Enigma messages to learn with.
From the section marked Typex – Encipher, choose Bundle 1.
The two documents from this bundle appear in your in tray (to the left of the screen); drag the first one (dated 3 September 1939) onto the document holder on top of the Typex. The day key is attached to the top of each message. This first example has the settings Y269 TPXA 4B 1D 7GR 2A 5J rvowk CBAMEFGHIJKLONDPQRSTUVWXYZ. If you’d rather skip setting the day key and go straight to enciphering, press the Set Day Key button just above the keyboard. This sets the rotors, wheel inserts, order, ring settings, reflector and plugboard for you.
To understand Typex best, though, let’s set the day key the hard way. Virtual Typex shows the day key as groups of codes separated by spaces. The first, Y269, is the type of rotor to use. One way to choose the rotors is with the blue buttons at the bottom of the screen, under the rotor box.
Press the blue Typex Y269 button.
This returns all the current rotors to the box and swaps in a new set, the Y269 rotors. There are seven rotors in this set, and 14 different inserts, each of which can go into any of the rotors either way round.
The second part of the day key is the name of the reflector to use. You can wire the reflector directly by dragging the ends of the wires, but to make it easier, click the white label on the reflector plugboard to switch between the available reflectors until it says TPXA.
The next five groups are the rotors and inserts to use, and the order to put them in the five positions on the Typex. Each is a number (the rotor body) followed by a letter (the insert). Some have a third character, R, meaning the insert goes in reversed.
The first rotor, for the far left of the drum unit, is 4B: rotor body 4 with insert B. But rotor 4 in the box currently has insert D, so we need to swap it.
Drag rotor 4 onto the workbench and drop it in the space provided (the dotted white area next to the screwdriver). Click the up and down arrows to change inserts until you find B, then click the insert to fit it back in the rotor. Drag rotor 4B into the left-hand position of the drum unit.
The second rotor is 1D: fit insert D in rotor body 1 the same way, and drag it into position 2.
The third rotor is 7GR: rotor body 7 and insert G, but this time with the insert reversed.
Drag rotor 7 onto the workbench and find insert G. Click the flip icon between the up and down arrows to reverse it, then click the insert to fit it. Drag this rotor to position 3.
Fit rotors 2A and 5J the same way. Then lock the rotors in place: first press the button on top of the reflector head (to the left of the first rotor), then release the wheel locking lever to the left of the keyboard.
The next part of the day key, the five letters rvowk, is the ring setting for each of the five rotors you just fitted. The ring setting is changed by releasing the small pin just to the right of the letter A on each rotor.
Click the locking pin release icon on rotor 1, and the pin pulls out. Use the up and down arrows to turn the ring until the letter R is next to the pin, then click the locking pin release icon again to lock it. Repeat for the other rotors with V, O, W and K. Then close the cover with the white button at the bottom left of the drum unit.
The last set of 26 letters is the setting for the plugboard on the right of the keyboard. First make sure it is the Typex plugboard (if the label says Enigma, click it to switch to the Typex version; they are wired slightly differently). The plugboard setting shown is CBAMEFGHIJKLONDPQRSTUVWXYZ. Each letter in the list is where each wire, in alphabetical order, is connected: the first letter is the socket for wire A, the second for wire B, and so on. To keep this example simple, only a few of the wires are changed from their default: A, C, D, M and O.
Drag the black circle on the end of each of those yellow wires and drop it away from its socket to disconnect it. Then drag the A wire (it should have sprung back to the right, to make it easier to find) onto the C socket until a white circle shows it will connect. Connect the C wire to the A socket, D to M, M to O, and finally O to D.
The other wires are plugged straight through (b to B, e to E and so on to z to Z), so they can be left as they are.
Each of these settings would have been set at the start of the day from a list supplied to both sender and recipient, and stayed the same until the next morning. In future, if you’d rather do it the quick way, just click Set Day Key to have all of this done for you.
Enciphering a Typex message
To encipher a new message, we first need a new random start position for each of the five rotors. As we’re in 1939, at the start of the war, the operator picked a random letter for each rotor and sent them to the recipient in plain text. For this example, we’ll use the setting OFKCR.
Use the up and down arrows over each rotor to set the letters O, F, K, C and R in the windows of the drum unit cover.
Before starting, check whether you are enciphering or deciphering, using the lever to the left of the drum unit. Make sure it is set to Cipher; if not, click the lever to change it. This sets the left and right printers to the right character set and spacing.
Also check that both printers are in letter mode. After the last message, a printer may have been left in figure mode, which would garble the printout. Use the manual button marked LTRS in front of each printer.
Press the FIGS and LTRS buttons a few times to check the printer carriage shifts, but leave both printers in LTRS mode.
You can leave the document holder raised to watch the rotors move, or lower it towards the keyboard with the white button at its top left. Drag the document holder’s position bar so it shows the first line of the message; you can use it to keep your place.
Type the first letters, W, A and R.
You should see (and hear, if the sound is on) the printers type the first letters, and the letter counter to the right of the drum unit move to 0003. If you can’t see Typex print anything, it’s probably because we are looking straight down on the machine, so the top cover and printer paper hide the printout.
Drag the blue bar at the top middle of the screen to the second position from the left, to hide the top cover. (The far left position hides the document holder too.)
Now you should see the tape on both printers. In cipher mode, the left-hand one shows the start of the plain text you are typing (WAR), and the right-hand one the cipher text, enciphered through the plugboards and rotors (DJS).
Carry on typing the message (don’t forget the space), but watch out for a special case in the second word, “having”. Remember, the Z, X and V keys are used for spaces and for switching between letters and figures, so to type the V in “having” you must switch to figure shift and use the shifted C key. Watch out for Z, X or V in documents; I can imagine it caused much frustration until the operators got used to it!
Type H, A, FIGS (\ on your keyboard), C, LETTS (/), then I, N and G.
As you type, FIGS and LETTS do two things: the left-hand printer’s shift mechanism switches, so the next characters use the alternate characters on the print heads, and the right-hand printer enciphers an extra letter for each FIGS or LETTS. So you should see the word HAVING on the plain text printer, but it has been enciphered as eight characters.
The enciphered tape should be grouping the output into fives, so although you have only typed ten letters, there are twelve enciphered letters. As FIGS and LETTS are linked to the Z and V keys, and space to X, those letters are what is enciphered. Typex rotors have only 26 contacts, like Enigma’s, and can only encipher A–Z. So the letters sent through the rotors are WARXHAZCVING, which should give DJSMI EXUOX QO.
Carry on enciphering the whole message if you like, but don’t type too fast: each key on Typex was held down mechanically until printing had finished, with a key lock so two keys couldn’t be pressed together. Keep a steady pace and check that every key press works the printers.
If you’ve typed carefully, the counter should show 0159 at the end. It was required practice to complete the last five-character group of the cipher text, so press the space key once more to make it 160. The 0 and 5 on the counter are red for this reason, so the operator could see they were at the end of a group. To reset the counter at any time, click the knob on the right until it shows 0000.
Always ending a message with the same set of up to four Xs is very bad for security, and this does seem to have been noticed by German cryptographers (see Christos military and intelligence corner), although security does seem to have been tightened later in the war, with random use of figure/letter shifts and spaces allowed to pad the last group.
Click the paper feed knob on the outer edge of the right-hand printer a few times to see the last few characters, and check you completed the group correctly.
Finally, the cipher text was removed from the Typex and the paper tape cut up and stuck onto forms, ready to send. The five-letter start setting chosen at the beginning was written into the first and last groups of the message and sent with it.
Click the tape to cut it: the message is pasted onto a document for you to see.
Your final message should read:
DJSMI EXUOX QOUYN FHABG PODUG HREYO LMTBJ
TXNVE ODDGC JSKLN FSKIN EUFXX XYMRA SQZBB
RHYVB JVVDK TWOWW IMXNQ JJNSA YUUTI OVBIA
CSQQT PRXLV LVQAT NRLLI HARUH XALEE UAUPP
KGTNM ZOIYD ZBXRO UKVLY
Click the bin icon at the bottom right to clear the document. To finish, grab the “Typed” stamp (just above the keyboard on the left) and drop it on your document to mark it as done, then drag it to the out tray.
Deciphering a Typex message
Deciphering a message is much the same as enciphering, with just a couple of small changes.
Load a message to decrypt: go to the Prefs / Messages menu and choose Bundle 1 from the Typex – Decipher section.
This is a set of six pages: an example of a re-enciphered Typex message sent from the Air Ministry to the Prime Minister, Winston Churchill.
Drag the first page to the document holder, This message uses a different day key from the one above (SP02390 TPXA 1AR 2C 3B 4DR 5G sbvuc AXZKVJNTRLGEPBIDWHOYMCFQUS), so set it the same way using the blue Typex SP02390 rotor set, or just click Set Day Key.
Set the cipher/decipher lever to Decipher.
Now the left-hand printer prints just the received message, in A–Z with five-letter grouping, while the right-hand printer shifts between figures and letters automatically as it receives the shift characters, printing the final plain text.
Press the LTRS button in front of each printer, and check the letter counter is at 0000 (if not, click the knob to the right until it turns back to 0).
As mentioned above, the five rotor settings chosen are sent in plain text as the first and last groups of the message. On the received document, the first and last groups are GPWBN: this is the key to set the rotors to.
Set each of the five rotors to G, P, W, B, N, or, if you’re in a hurry, press Set Start to do it for you.
Now we’re ready to type. Importantly, the key GPWBN is not part of the encrypted message and shouldn’t be typed: start typing from the second group, AYVHS. This time there’s no need to worry about Z, X and V; we only ever type the letters A–Z, exactly as on the document. Don’t type a space between the groups: it’s all one long string of letters.
Type the groups from the first two lines of the message, AYVHSNYYIL … FHOJOYKGLR.
If everything is set up correctly, English plain text should start coming out of the right-hand printer. Well done! Carry on to the end of the message, using the letter counter and the document slide to keep your place; the counter should always end on a red 0 or 5 after each group. Remember not to type the last group, GPWBN (it’s just the start setting, not part of the message).
Stamp the document as done and drop it in the out tray.
Each page of the document is enciphered with a different start position but the same day key, so you don’t need to change the rotors between pages, just set the new start position. Try to recover the whole message!
Deciphering an Enigma message
Typex was based on the commercial Enigma available before the war, and so, with a few small changes, it could still decipher Enigma messages. This was used at Bletchley Park during the Second World War to read German messages once the codebreakers had broken the daily key with the Bombes. Once they had the wheel order and rotor settings for the day, these were set on the Typex machines, so the messages could be deciphered just as the intended recipient would.
Let’s try a real enciphered Enigma message and see if you can read it.
Load an enciphered message: go to the Prefs / Messages menu and choose Bundle 1 from the Enigma – Decipher section.
This is a set of five authentic messages, enciphered on Enigma in 1941 and used with permission of Crypto Cellar Research (Breaking German Wehrmacht Ciphers). They come from German Army SS units of Heeresgruppe Nord (Army Group North), taking part in Operation Barbarossa, the attack on the Soviet Union.
Drag the first page to the document holder.
The day key for each message is taped to the top of the message. You can set it automatically with the blue Set Day Key button, or follow the steps below to set it by hand.
The day key for this message reads ENIGMA B IV II III sbv CT EM FI GJ HK NQ OR SW UY VX. The first word tells us it’s an Enigma message, and the B that it uses the B Umkehrwalze (reflector). The main German Army Enigma had three reflectors, UKW-A, B and C, with different internal wiring, which could be swapped in the machine.
Click the label on the left-hand plugboard until it shows UKW-B.
The next three groups, the Roman numerals, are the three of the five available rotors chosen for the day: IV, II and III, in that order from left to right.
Make sure the Enigma rotors are selected, by clicking the blue Enigma I button below the rotor storage box. Drag rotor IV into the first position from the left in the drum unit.
This is the “slow” rotor, the one that turns least while deciphering.
Drag rotor II into the second position and rotor III into the third.
The standard Enigma I used three rotors, but Typex has five spaces, so the two gaps must be filled with special blank rotors, wired straight through. In Virtual Typex these are coloured white, and are the two rotors on the far right of the box, called S1 and S2.
Drag the special rotors S1 and S2 into the last two gaps in the drum unit. Then lock the rotors in place: press the button on top of the reflector head (to the left of the first rotor), then release the wheel locking lever to the left of the keyboard.
The next part of the day key is the Ringstellung (ring setting), here the three letters sbv: the position of the wiring ring on each of the three rotors just fitted. To set it, release the spring-loaded pin on each rotor and turn the alphabet tyre until the required letter is next to the pin.
On the first rotor, click the pin release button (just to the right of the letter A on the rotor), and the pin pulls out. Use the up and down arrows on that rotor to turn it until it shows S at the top, then click the pin release button again to fix it.
Do the same on the second and third rotors, setting them to B and V.
The last groups of the day key are the Steckerbrett (plugboard) settings. Each day key used ten wires, each swapping two letters: here C and T, E and M, F and I, and so on to V and X.
Before changing the wiring on the right-hand plugboard, make sure the right plugboard is fitted. The Typex and Enigma entry heads are wired differently, so to read Enigma messages a rewired plugboard was used, making it easy to switch between Typex and Enigma mode without physically rewiring the machine.
If the label on the right-hand plugboard shows Typex, click it so the Enigma plugboard is fitted.
The first pair on our day key is C and T.
Drag the black circle on the wire marked C and drop it just off its socket. It should spring back to the right (to make it easier to find; the wires weren’t spring-loaded on the real Typex). Do the same with the wire for T.
To swap the letters, drag the C wire to the socket marked T (a white circle shows when it will connect), and the T wire to the C socket. Do the other 9 pairs in the same way.
The day key is now set up.
Typex has a cipher/decipher lever, so you might expect to set it to decipher for this message. But in decipher mode, the right-hand printer tries to decode the received letters into the full Typex set of letters, numbers and punctuation, while Enigma only used A–Z. So I believe Typex was left in cipher mode, which prints just letters correctly on the right-hand printer (even though the left-hand one doesn’t always print the received message correctly). This matches the real Typex tapes showing deciphered German messages in groups of five, stuck to the backs of some real received message forms (see Bletchley Park Collections Uncovered 4 for examples).
Make sure the cipher/decipher lever is in the right-hand Cipher position, and press the LTRS button in front of each printer so they start in letter mode.
Now we can, at last, start deciphering. First we need to find the start positions of the three rotors chosen by the Enigma operator. At this time those three letters weren’t sent in plain text, but were themselves enciphered on Enigma first, so we need to do a little work to find them.
On the received message, just above the groups of five letters, is the line 0500 - 143 - TCV IEI. This was sent in Morse code just before the message itself: the time sent, the number of characters in the message, and two three-letter groups (TCV IEI). These are what we need to find the real start positions, just as the real Enigma operator did.
The first three letters, TCV, are the starting positions for the first three rotors. This is easier to see with the drum unit cover closed, so the letters show through the windows.
Close the drum unit cover if it’s open (the white button at its bottom left), then use the up and down arrows to set the first three rotors to T, C and V.
A historical note: the German operator hasn’t moved the letters far from the ring settings, SBV. The first and second rotors have moved only one place and the third not at all. This message was sent at 5 am, so was probably the first message with the new day key. This laziness in not moving the starting settings far was spotted by the Bletchley Park codebreaker John Herivel, and became known as the Herivel tip. It could sometimes be used to quickly guess the ring settings.
The second group of three letters is what we type to get the real start position.
Type I, E and I on the keyboard.
The result is typed on the right-hand printer. If you can’t see it, because from our viewpoint above it is under the cover, drag the blue slider to the left to hide the cover, or use the paper feed knob to the right of the right-hand printer to feed the tape out far enough. You should find the three letters are CGU.
This is the actual start position to decipher the message: set the first three rotors to C, G and U.
To keep track of where we are, we can use the letter counter to the right of the drum unit.
Click the knob to the right of the counter until it shows 0000.
Now we’re ready to type. Importantly, the first group of the message, LYASO, is not part of the encrypted message and shouldn’t be typed. This group was the Buchstabenkenngruppe (letter identification group), telling the German recipient which day key was used; we don’t need it. Start typing from the second group, CDPSK, and don’t type spaces between the groups: it’s all one long string of letters.
Type the groups from the first two lines of the message, CDPSKLDFHV … LHUJZZGUNO.
If everything is set up correctly, German plain text should start coming out of the right-hand printer. Well done! The message should start ZWO NEUN NULL BEWEGUNGIUNFAEHIG (TWO NINE ZERO, and possibly a misspelling of BEWEGUNGSUNFÄHIG, immobile?). Carry on to the end, using the letter counter and document slide to keep your place; the counter should always end on a red 0 or 5 after each group.
Stamp the document as done and drop it in the out tray. Well done, codebreaker!
Why not try some of the other messages in the in tray and see what you can decipher? If you don’t know German, can you use an online translator to work out some of the words?